Thursday, October 14, 2010

ONLY GOOD NEWS

I don't know about the rest of you, but I have been so tired of hearing bad news that I have stopped watching the news, reading the paper and started not feeling bad when I hang up on solicitors that won't listen to me.

By no means do I bury my head in the sand. I own a business and know how bad it is right now, but I figure if it's meant to be heard by my ears it will find it's way to me ~ and it does.  
Some days I can feel it dragging me down mentally and physically ~ I get lethargic, stand there in confusion with what to do first, end up not getting much done and then getting angry at myself for not getting things done. It's a vicious circle. 

 SO, I have decided to start an ONLY GOOD NEWS series.  Stories that give you hope, will ease the mind and forget what's wrong in the world for a moment. Stories that inspire and warm the heart. No matter how big or small the story...


The oil spill and the sea turtle story.

The turtles population at the gulf of Mexico is slowly recovering after the oil spill, according to researchers, during the time after the spill most turtles were covered with oil, and today only few moderately or heavily oiled.  For the Gulf Coast fauna, at least, things are looking up. The seaweed where turtles normally spend most of their early lives is showing much less sign of oil from the spill, where previously the oil was "thick enough to wrinkle," according to Witherington. Small crabs and birds have also returned to the habitat.

The turtles themselves seem to have survived relatively unscathed. Researchers had feared that the crude would cause them skin problems and organ toxicity. Since that doesn't seem to have happened, researchers are no longer capturing turtles that actively seek to avoid them.

"We're confident these animals are doing fine on their own," Stacy of the fisheries service said.


  Today, if someone starts talking negative stop them and mention the sea turtles and tell me what they say.

Peggy ~ GG ~ Goodgosh


Wednesday, October 13, 2010

A publication that I love

A few years ago I came across a really cool publication called Somerset Studio. I fell in love with this magazine.    
            
I, personally like the ones more along the lines for mixed media and altered art. As I read and looked at some of their other publications, I saw that they had one for just about every kind of artwork or creating. They have one for jewelry, sewing, card making, handbags, going green, just about anything you can imagine. (they even have one for the art of blogging!)
http://www.stampington.com/html/main_magazines.html

They have a relatively new publication called Somerset Apprentice that shows you in-depth step by step techniques. 
This is nice, as I am always looking for different styles and methods. It is fun to try new things and to experiment outside your usual comfort zone. Sometimes I try to figure out how to get a certain look or something done a certain way and have gotten some great ideas from reading one of these publications.
 Another thing that I like about these magazines is that they have monthly contests you can enter your work in. So, some of your own handmade creations could be published. How cool would that be? 
There is an interactive feel to the articles and the artists that they feature are willing to share their experience and methods.
The actual publication is beautifully done, from the quality of the pages, to the photographs. (even their ads) Most of these are quarterly publications and can be a little expensive, but even buying just one or two of them, is well worth it.
         I really like their publications and just wanted to share them with you. It was through this magazine where I first learned about Etsy, and got started on another avenue of my artwork.
(jj)
 
You can also purchase supplies and other materials from their website.

          This is their home page
http://www.stampington.com/index.html

Monday, October 11, 2010

Let's Repurpose!

We know about reuse, recycle, and upcycle, but the most difficult for me is to repurpose. To have an item that is in good condition and that I love, but it's intended use is no longer necessary (or logical). I don't want to rework these pieces or alter them if I don't have to.

To repurpose an object requires we "think outside the box", and I find this extremely difficult sometimes. I will stand and stare at the item trying to picture other uses in my mind. There are some people on this blog who are very good at this, I'm not one of them.

An example is this linen piece which was created to hold the knives from a silverware set. I have absolutely no use for it for my knives. However, it is in mint condition with hand embroidery done lovingly by someone many years ago. The thought of altering this in any way wasn't an option for me. After spending literally months thinking about it, I realized it would make excellent storage for my crochet hooks, and could accommodate a large quantity and variety of sizes. Perfect! I'm thrilled with its new use.

What objects do you have that you can't part with, but are at this moment wrapped and stored in a box somewhere? It's time to get them out where you can see them, think about them, and find a current way of enjoying these pieces. In the post by goodgosh, Peggy last week, she painted a  figurine in blackboard paint, and now messages can be written on it, and it's adorable as well as fun. Repurposing adds new life to old objects and make great conversation pieces.

Collecters, crafters, and artists are the original recylers. We've been doing it all our lives.

pepper

STUFF AND NONSENSE

1.  Ever wanted to paint like Jackson Pollock?


http://www.jacksonpollock.org/
Enter the Jackson Pollock link and drag you cursor over the page, click your mouse to change the color of the ink.
Want to save your masterpiece….do a screen shot of it and save it as a jpg into a file of your choice.

2. Wonder where the severe weather is?

http://www.wunderground.com/severe.asp

3.  This is for Sarah~Magnolia Surprise
How to write upside down….


http://www.revfad.com/flip.html

Write your sentence in the top box, it will be flipped in the bottom box…then copy and paste the upside down sentence.

4. Want to create a mosaic for your blog or website?

http://bighugelabs.com/mosaic.php

5. List of Etsy acronyms and lingo

http://www.etsywiki.com/index.php?title=List_of_Etsy_acronyms_%26_Lingo

6. How to find a font you like and install it on your computer

http://citrustreedesigns.blogspot.com/2009/01/how-to-find-font-you-like-and-install.html


7.  Word Clouds

http://www.wordle.net/

Click on CREATE, fill in one of the 3 sections (this is the word cloud for the URL of our blog), click go under the top box or submit under the next 2 boxes, play with the colors, fonts, layouts, etc….then save to public gallery….I then did a screen shot of the masterpiece saved it as a jpg, and then edited it in my photo program.

8. Want to be notified if your ever on the Front Page and other info…

http://www.statsy.org/vutrac.php

9. Circle The Cat Game…will drive you crazy!

http://www.members.shaw.ca/gf3/circle-the-cat.html

10.  Recipe site….yum!

http://www.chow.com/recipes/10992-pico-de-gallo?tag=search_results;results_list

11.  How to do a screen shot on a PC:
Open up your page you want a screen shot of, then click on view in the tabs at the top of the page and click on Full Screen, position your page then find the keyboard button for Print Scr (top row, right hand side) hit that key, then
open up your programs and find Paint, open it...
Open Edit, click on Paste, next open your File tab and click on Save as (save as a jpg.) then put it in any file you want on your computer. I save all mine to a file on my desktop.

12.  Screen shot on a MAC:
Click on the browser window you want to capture. Press Shift + Command + 3 at the same time. This will create a picture on your desktop. Rename it and upload your file to your bug report.

VE

Sunday, October 10, 2010

Make Someone Happy!


https://blogger.googleusercontent.com/img/b/R29vZ2xl/AVvXsEglFCKgyJrtSsppgLZ4Sf1pUjOmxrUkKWyxMnyWHNnUqRvWkJkI6W05HBsgp26BwBJztlr8RtKTfmJnLiZS7INQERSsN21FZFDNof8QreiuzfI41H0PKfSCPpg39XZjjB3flOIwt3C4pHb7/s1600/smileyline.bmp


It's tough enough getting a sale these days on Etsy.  Think how it is for new shops, being small fish in a big sea.
I've done a series of treasuries of shops that are still waiting to be discovered.  Stop by and make someone happy, make just one someone happy!
This week, I continued my series of undiscovered shops called Marvelous Marvels, here is this weeks entries:
Part I:
Part II:
Part III:
Last week.
Vintage and Misc. items:  http://www.etsy.com/treasury/4ca863ba63448eef874ce1c7/undiscovered-shops-vintage-and-misc

Simply click on the links above to see some amazing new shops on Etsy!  And don't forget to leave comments on the treasuries!

Saturday, October 9, 2010

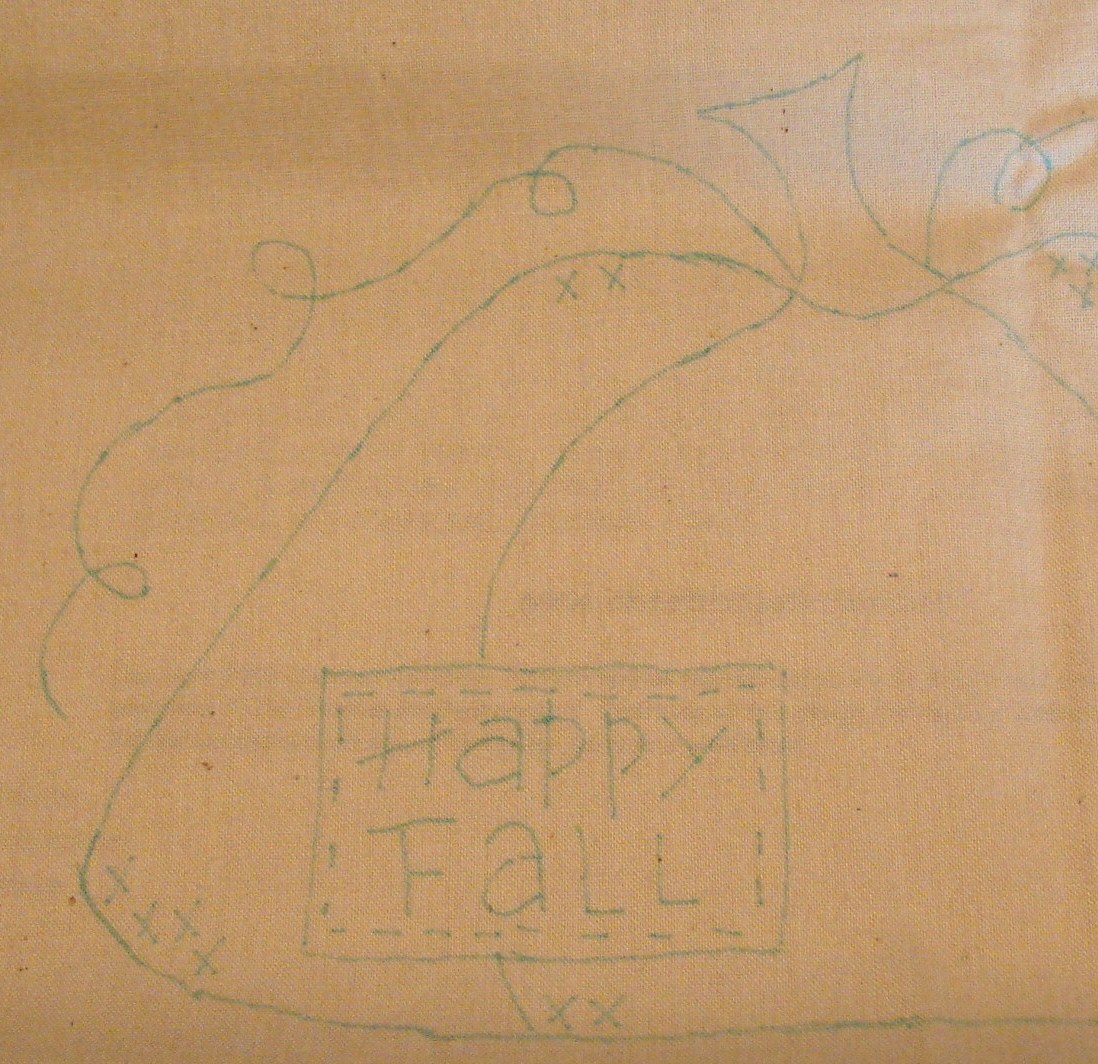
Primitive Stitching


I love the simplicity of primitive stitching!  There's no rules, you do things the way you want to.
You start out with a pattern, muslin (color of your choice) and a Mark B Gone (these are the fabric pens that disappear when you are done and wet the fabric) pen.

Lay the muslin over the pattern and trace it with your Marks A Lot pen.  If you are having trouble seeing the pattern, you can use a light box behind it all.

Now you start stitching following the lines.  Your stitches don't need to be uniform, that's the fun of primitive stitching.
I used 4 strands for the Happy Fall sign and 2 strands for the rest.  I love using the loop method when stitching so there's no knots on the back.  Only drawback to this is you must use an even amount of strands.

Continue to stitch until finished.  At this point, you can tea dye the fabric or do other methods of your choice to darken the material or make it look old.

This project is on the smaller scale and can easily be done in a few hours during the evening!  Do a larger one for a weekend project.  Either way, they work up quickly.  Most primitive stitcheries use very few colors. 
After dying, press the entire piece and frame.  I use quilt batting to back it and never put glass on them.

I've done so many of these and have always enjoyed doing them.  Believe it or not, I don't have one of these of my own, they are always taken by friends or family members!  I think my favorite ones to do are Halloween primitives!

This one is going to be part of the next blog giveaway!  Hope you like it.
RWS

Friday, October 8, 2010

"A Day in the Life" with Michelle”

Okay, do you have your cup-o-joe?  It’s that time of the week again.  I’m so excited to share with you this week because I have purchased from this shop and I was just dying to know how she creates such beautiful pieces.  So get ready, it’s time to take a journey to:

A Day in the Life with Michelle,
owner of IRCrafty

Click on the banner to go visit her shop


Duuuuuude:  How long have you been creating items from Polymer Clay?  

Michelle:  I have been working with Polymer Clay for 10 or so years.  I started by making little figurines and then discovered a Millefiori technique (little flowers).  I began up-cycling Altoids Tins by embellishing with Polymer Clay about 5 years ago, however, the Millefiori technique I'm currently using, I have only been using for a little over 1 year. 

Sample of a cane
Duuuuuude:  Michelle, I’m not that familiar with the terms “Millefiori” and “canes”.  Can you give us just a little background on this?

Michelle:  Millefiori or “caning” originates from an ancient Venetian glass-blowing technique where long rods of glass were made with tiny flowers going through the entire length. It is Italian for “A thousand flowers”.  Polymer Clay artists have adapted this technique for use with clay.   

Duuuuuude:  What inspired you to start creating these?

Michelle:  I cover many things with clay.... Pens, votive candles... if it can be baked, I've most likely covered it.  I carry my daily dose of vitamins around in my purse in an empty Altoids Tin.  On one of those days where I had a creative spark, I decided to cover it with clay to make it a little prettier.  I have to admit, it didn't turn out quite a nice as I had hoped.  With practice, I was able to make them nice enough to begin giving them as gifts.
Beautiful Trinket box

Duuuuuude:  Tell us a little bit about your process for creating

Michelle:  I start a project by pulling out all of my canes and decide on a color combination.  I pick a coordinating background color and then slice paper thin flowers off of the canes and place them onto the background.  This part just kinds of develops as I go along.  I create a sort of "Fabric Sheet" of the clay and flowers.  That sheet gets draped over whatever item is to be covered.  Or I roll them into beads and then bake them.  After all is cooled, I wet sand the pieces with 5 decreasing grades of sandpaper until they are smooth and shiny. 

Duuuuuude:  Where do you typically get your supplies?  

Michelle:  I get my clay from a variety of places, depending where I can get the best price.  Mostly craft shops, but there are a couple of brands of clay that I can only get online and I only get those for certain applications.
   
The Altoids tins I get from many friends and family members that collect them for me

The IRCrafty Studio
Duuuuuude:  Where do you get your ideas for your items?  

Michelle:  I try to carry my camera wherever I go and snap pictures of flowers in nature.  Then I try to duplicate the colors in the canes that I create. 


Duuuuuude:  Where do you sell your items?

Michelle:  I have done a couple of craft fairs but mostly in my Etsy Shop.


Duuuuuude:  Anything else you'd like us to know?

Puffy Heart Bead


Michelle:  I am also in the process of making more of a variety of polymer clay beads.  I'm not sure if I am going to develop them into jewelry pieces or sell the beads for others to create jewelry. 

Thanks Michelle, I truly enjoyed getting to know your “craft” a little better.
Click logo to visit shop
Don’t forget to check out her shop at:  --------------> 


Thanks for stopping by and have a great weekend.